Friday, 30 September 2011

Firewise

This term we have been learning how to be firewise. Being firewise is all about knowing what to do around fire. Things like keeping safe around fireworks, treating candles carefully, rules about using lighters and matches, and what to do if there is a fire. We have looked closely at a fire alarm, we practiced how to crawl on the floor if the fire alarm goes and we really liked yelling "Fire, Fire, Fire". Using our play-phone we pretended to ring 111 (New Zealand's emergency number) and asked for the fire-fighters to come to our address.

This week we acted out the 'Fire-Fighter Song' sung to the tune of 'I'm a Little Teapot'. We had lots of fun making up the actions to the poem, especially the part where we shouted 'shhhhhh' and pretended to put out a fire.

We also made fire collages.

It was lots of fun ripping up the paper for our collage, but we made a huge mess to tidy afterward. Ripping paper is a great experience. Gripping the paper with our working fingers (our thumb, first and middle fingers) lets us practice strengthening our small finger muscles ready for gripping a pencil to write with. Listening to the cool sounds that the paper makes as it tears is also fun. Sometimes we were so busy listening we forgot to talk!

Gluing paper with sticky PVA glue is an interesting sensory experience. Some children enjoyed the sensation and were quite happy to have their fingers and hands covered in glue, others quickly wanted to wash their hands before they had even finished gluing.

We used sticks in our collage that we found during a walk around our school.

Wednesday, 28 September 2011

Green Fingers

During our Mountaineers Discovery session we have been busy planting seeds and seedlings in the garden. We are very lucky to have an amazing vegetable garden here at Totara Park School. Hopefully, one day we will be able to eat and sell our delicious vegetables.

These will one day (fingers crossed) grow in to yummy red onions.

We used gentle hands to plant our vegetables.

Check out our lovely neat rows of red onion, beetroot, and carrots.

We made little tags for our vegetables by cutting down ice-cream containers, I wrote on the name of the vegetable and drew a picture of it for non-readers.

Friday, 23 September 2011

La Grenouille - The Frog

As part of our Rugby World Cup Inquiry Unit we studied France. The children were fascinated to discover that people eat frog legs in France. This inspired shared reading (well.... singing) of frog poetry, a shared book about the life-cycle of a frog, and and some fantastic frog headbands with incredibly long tongues that we created as part of our French Day celebrations. 
We *heart* headbands in Room 1.

This frog headband is a super simple paper-craft activity.

You need: sellotape, stapler, scissors, a long strip of paper for the headband, a frog picture, and a smaller strip of red or pink paper for the tongue.

I found a picture of a frog from the internet. I photocopied it onto coloured card, but you could just colour it in. Crayon and dye would look great too.

Cut out the frog (practicing those very important cutting skills), and then cut one end of the frog's tongue so the end is curved like a real tongue.

Sellotape the tongue onto the frog's mouth so that it sticks up, don't worry it will curve down to hang over the front of the frog.

 Measure the headband by placing it around the child's head, then carefully take it off and staple it. I place the stapler so that the flat part of the staple is against the child's hair (on the inside of the headband). That way it won't get caught on any hair.

Staple the frog onto the headband. 
Voila! A French Frog Headband!

 You can also curl the frog's tongue for extra real-life frogginess.

Most of the 5 year olds I worked with were able to do this activity independently, with only some help needed for stapling and measuring the headband.


Here are some of the other ideas we used in our teaching syndicate for amazing French themed art and craft for our French Day celebrations:

A rooster hat.

Paper plate snails.

Sunflower collage.

A popsicle stick Eiffel Tower.

And French Flag/Eiffel Tower crayon and dye art.


Some facts about France that we learned:
  • The rooster the the French national bird.
  • The French flag is blue, white, and red, it is known as the French Tricolour.
  • They eat snails and frogs legs in France.
  • Paris is the capital city.
  • The Eiffel Tower is in Paris.
  • They love to play rugby in France.

Thursday, 22 September 2011

The Button Snake

Another fun reading activity we enjoy in Room 1 is 'The Button Snake'. I was inspired after seeing this post.


I like this activity as it involves a practical skill (using buttons), it strengthens fingers as children practice this fine motor skill, and it is an alphabet activity (recognising and ordering letters). I used about a metre of ribbon and stitched a button on each end. As I'm not a super skillful sewer (buttons and hems are my limit), I used rectangles of felt and cut a slit for the buttonhole. I then stuck on sticky foam letters, one for each of the letter of the alphabet. You could sew on letters or embroider them.

 We use this activity as one of our reading activities, the children button on the letters in alphabetical order or use the letters to make a ribbon snake of sight words.

Friday, 16 September 2011

Elephant Collage

Who am I?
I am grey.
I make a loud noise.
I am very big.
I have a trunk.
I have 4 legs.
I am an elephant.
By Room 1

All week we have been share reading 'The Zoo' poem and talking about Zoo animals, next week we will be writing our own 'Who am I?' animal riddles for our friends to read. I love how this type of writing is so interactive. It is always fun to lift the flap to discover the answer to the riddle.

We have also enjoyed reading about the adventures of Elmer the Patchwork Elephant (by David McKee). Elmer is a kind and funny elephant who loves to play jokes on his fellow elephants. The neat part of the story is that it subtlety presents the concept that it is okay to be different.


Today we made these fabulous patchwork collage elephants, thanks to Montessori Moments for inspiration and a great step-by-step tutorial.


An elephant in progress, look at the very careful placement of Elmer's patchwork.

 This elephant is nearly ready for cutting, he is just making sure the outline is covered in patches of paper.

And finally practicing our very important cutting skills and carefully cutting Elmer out.

My class of 5 year olds were able to complete this art work almost independently, with just some help needed cutting around Elmer's legs.

Thursday, 15 September 2011

Sand Tray


 I recently introduced a sand (well... salt) tray as part of our writing program. The sand tray is a great sensory experience for beginning writers. Using the laminated copy of the alphabet (from this handwriting book) the children are able to practice their letter formation. I am hoping that the sensation of the moving the sand and the larger arm and hand movements made when writing in the sand tray will discourage some of the common letter reversals (d/b, p/q, s). And that by using the first two fingers of their writing hand the children will then use the same fingers when they grip a pencil to write with.

I have one gorgeous child in particular who will request to use the sand tray everyday, he loves the extra stimulation that the texture of the sand brings. He also loves using the brush and shovel to sweep up any lost 'sand'.

Ways to extend this activity:
  • Use an ice-block stick to write with.
  • Draw pictures or shapes in the sand.
  • Use coloured match sticks build letters in the tray.
  • Create sentences or words using magnetic letters.
  • Write digraphs and trigraphs in the sand.
  • Or... drive cars through the sand and bury them (a current favourite in Room 1).

Wednesday, 14 September 2011

Tweet, Tweet, Tweet

For our Mountaineers Discovery session this week we discovered all about birds.The children had a fantastic time exploring a range of activities, including making the cutest little chicks hatching out of their eggs and creating some very colourful birds with beautiful tail feathers.

You know things are successful when you spy kids in the playground playing with their creations at lunch time.

Here are some of our hungry chicks waiting for a delicious wiggly worm.

  A chick in progress - some very careful gluing is evident.

 This beautiful bird is keeping warm in her nest of newspaper. We used coloured card for our birds and drew on the eyes and beak (you could use googly eyes too). I precut the card in to a half circle and the children stapled it in to a cone, then sellotaped on the feathers.

Another activity involved sorting and matching coloured photocopies of stamps of New Zealand endangered native birds. 
I have put copies of the stamps I used on my Printables Page.

We also had a couple of magnifying glasses out. The kids loved using these to take careful notice of small details.

We practiced walking like a 'moa' on our Bird Feet (aka Monster Stompers).

Tuesday, 13 September 2011

Daffodowndilly

To celebrate the return of spring we made these cheerful collaged daffodils. Our poem for the week was ‘Daffodowndilly’ by A A Milne. The children really enjoyed reading the poem and discussing the images that the poet was trying to make us imagine.  So, by the time Friday arrived we were more than ready to make our own daffodils.


We used orange and yellow cupcake cases(from the $2 Shop), a large one for the daffodils sun-bonnet, a small one for her yellow (or orange) head, and a green pipe cleaner for the daffodils green gown, all accessorised with green leaves drawn on in crayon. 

I displayed our daffodils with a copy of the poem; the laminated version goes into our poetry basket to be read during reading time. The children really enjoy being able to read the poems by themselves and will often use the ‘magic wand’ to point to the words as they read to their classmates.

Monday, 12 September 2011

I Spy Jars

Thanks to Counting Coconuts for inspiration I have created ‘I Spy jars’. We are using the jars as one of our reading and writing activities, and the kids love shaking the jar and hunting for letters or words.


I have made an alphabet jar and a sight-word jar. Each jar is filled with coloured rice. (Rice in a zip-lock bag with a few drops of food colouring, left to dry overnight.) You could use small plastic beads or sand if you don’t like the idea of using food.

For the alphabet jar I used my scrap-booking letters, using every letter of the alphabet. Before I put them in the jar, I took a photo to attach to the jar with ribbon.

The sight words are some of the words that we expect children to know by sight. Being able to read and write these sight words makes reading and writing much easier and faster. I made sure to laminate the words and used a smaller version to attach to the jar as a checklist, so the children know what words they are hunting for.

Before I presented the jars we talked about how to use them with respect (a very important word in our class). As the jars are glass, they are breakable, but in Room 1 we are learning to be careful and gentle when we are using equipment. I often spend time with the children talking and modelling exactly how to use equipment. Then I invite children to model to me how they would use (or in some cases not use) our special things. This is very valuable as they all know what is expected of them and often remind others who may forget.

I used clean glass jam jars, but you could use whatever takes your fancy. I have another jar in progress filled with small toys.

Hint – To remove sticky labels from jars fill them with boiling water and peel off the softened label. Then use nail polish remover to remove any residue.

Sunday, 4 September 2011

'The Shopping List'

A popular independent writing activity in Room 1 is ‘The Shopping List’, so popular in fact, the kids ask during choosing time if they can write one (instead of playing families in the Home Corner or designing a gigantic road out of the big wooden blocks for their cars to zoom along).

There are several reasons why I love this activity:
  • It has real life applications.
  • It’s easy to feel like a successful writer.
  • There are lots of possibilities for extension.
  • It really is independent.
  • And it all belongs in a nifty teeny-tiny shopping basket.

Now - why the kids like it:
  • They get to take their list home and tell Mum and Dad what to buy.
  • They can talk to each other about their food preferences.  (Who doesn’t like talking about food?)
  • They feel successful creating something that they have seen adults writing.
 A shopping list in progress.


‘The Shopping List’ consists of around 30 laminated cards and photocopied shopping list outlines from Sparklebox (pegged together with a large clip), all contained in that nifty teeny-tiny shopping basket.

I started by cutting out a variety of items out of the junk mailer from the supermarket. I tried to include; meats, fruit and vegetables, snack foods, dairy products, and body-care and cleaning products. Once I had enough, I cut squares of paper, making sure I could fit them easily in the laminating pouch (squares measuring 9cmX9cm were perfect). After gluing the pictures onto the squares I ruled lines across the bottom of the card and wrote the labels in my best handwriting.
You could do this on the computer, but I wanted to make sure that my writing used a ‘looped k’ and no flicks, as many fonts don’t have this I did it by hand. I also think to it is nice for the children to copy something where they can see that it is handwritten and the pictures are from real life.


To extend this activity:
  • Ask the children to list foods for dinner, or lunch, or school.
  • Get them to find and record certain groups of foods.
  • Ask them to write foods to buy for special occasions, like a birthday party or a bbq.
  • Instead of foods, use pictures of toys, and the kids can write a wish list (for themselves or gifts for someone else).


Now that they can write a shopping list, how can we get them to do the shopping for us?

Saturday, 3 September 2011

Spring Playdough

Spring has finally sprung. After snow only two weeks ago, today is a beautiful sunny day and my freesias are flowering.

This week we have several preschool visitors joining us for our Discovery Session (held every Wednesday morning from 9.00 til 10.30).

So in celebration of the season our theme for this week is Spring. I have just made this amazing smelling green peppermint play-dough to use when creating some beautiful spring gardens. We are going to use some colourful flowers and pebbles from the $2 Shop for our gardens. 


Thanks to Heretaunga Kindergartens for the recipe. Here it is for you.

Ingredients
2 cups flour
1/2 cup salt
2 tablespoons cooking oil
2 tablespoons cream of tartar
1 1/2 cups boiling water
1 teaspoon food colouring

Mix all dry ingredients, add oil and boiling water with food colouring, mix well.
Store in an airtight container.


I use less water than the Kindergarten version so I have reduced it. Sometimes you need to add a little more flour when kneading. 
This recipe makes a lovely play-dough that lasts for several weeks depending on how often you use it. Which in Room 1 is at least 2-3 times a week.  

We *heart* play-dough.
 Hopefully, not enough to be tempted by its pepperminty goodness to eat it.


Other types of play-dough that we have had or plan to enjoy include:
  • Pirate play-dough - with gold dust (dark gray play-dough with lots of gold glitter)
  • Lemon play-dough (lemon essence and yellow food colouring)
  • Ocean play-dough (blue food colouring  and lots of shells from the beach and all of my mini plastic sea-creatures)

Friday, 2 September 2011

For Dad

Spoiler Alert - If you are a Dad please read after Father's Day.

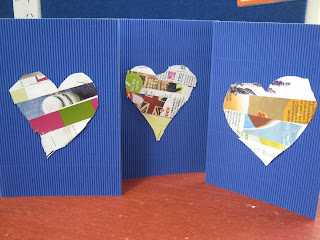
In Room 1 today we have been busy creating cards for Father's Day.

In New Zealand Father's Day is held on the first Sunday of September. (Funny how Mother's Day is the second Sunday of May.) In preparation for this momentous event, all week we have been reading books about Dads as well as a very sweet poem titled 'Daddy'. (As a side note I try to select poems and texts to share read that fit in with a theme for the week.)
Our cards have a copy of the poem glued to the inside and a sweet message from the card's gorgeous sender.

But the outside is the exciting part. As part of our Visual Arts Collage Unit we created these cute collage hearts (thanks to Itty Bitty Love for inspiration).


The Steps:
  1. Use a glue stick to cover the heart shape with plenty of glue (I cut these out of card before hand).
  2. Stick on long strips of paper covering all of the heart - we used magazine pages, but you could use old photos, newspaper, strips of tissue paper, or coloured paper.
  3. Turn over the covered heart and cut it out carefully with scissors. (This is a great meaningful opportunity to practice those important scissor skills.)
  4. Staple or glue the heart to the card.
For our card we used bright blue mini-corrugated card, so we used a stapler. Because glue just didn't do the job.


Hopefully these cards survive the trip home and can be enjoyed on the special day!

There is a copy of the poem we used on my Printables page.