Wednesday, 30 May 2012

Our Celebration for the Queen

We celebrated the Queen's birthday and diamond jubilee at Discovery this week. Our Mountaineers and children from the local kindy (who joined us for a visit) had a great time learning about the Queen and her family, the Union Jack, and the Queen's Diamond Jubilee - 60 years since she became queen.

 
We wrapped up boxes as pretend presents. I printed these present wrapping instructions from Sparklebox. I loved our kiwiana wrapping paper and bought it especially for the Queen to enjoy (We will write a letter to the Queen later this week and I will take photos of our presents to include).

 We discovered that the Queen wears a crown, so we made crowns with foam shapes and sparkly bits. Some of my class wore their crowns for the rest of the day.

We coloured in the Union Jack, this child is only four - I think he did an amazing job! We also hung numbered Union Jack Flag bunting on ribbon.

 
We coloured in birthday cards for the Queen.

We made paper flowers with straws, paper, and pompoms, because the Queen loves to get flowers. I was encouraged to see some very careful cutting. Cutting is a skill that we try to practice at our Mountaineers sessions. Cutting basic shapes to make different art or craft gives children the opportunity to follow simple instructions. "Cut this and then....."
Check out the 'Carrot Tree' we made for the Easter Bunny.

We folded paper to make origami dogs, we discovered that the Queen loves corgis. I used these instructions.

We had an imaginary birthday party for the Queen, including birthday cups of pretend tea.

It was fantastic to have Totara Park Kindergarten visit us. My class really enjoyed seeing their old friends from kindy and loved the opportunity to show the younger children their classroom and all of the cool things they have done at school.


Monday, 28 May 2012

Making Butter


We made the most delicious yellow butter as part of our inquiry learning unit on milk. We had a great time taste testing our butter on bread. Yum!
To make butter first pour cream into a jar.

 
Shake the jar firmly. Pass the jar on to the next person when your arms get tired. We practiced our counting while we were shaking the jar.

 Watch carefully and the particles of butterfat will start to stick together and separate from the buttermilk.

 Pour off the buttermilk and use a little water to rinse the butter.

 Spread the butter carefully with a knife - I found it interesting to see the different skills children had with a knife. We will definitely do some more cooking and food preparation and try to improve the children's confidence when using a knife.

We found out that cream that comes from cows that eat lots of grass will make the yellowest butter. Grass contains carotene which makes the butter yellow. Our butter was lovely and yellow.

We discovered that butter is not that hard to make at all. The children were fascinated with the process and the science behind it. Prior to making our butter we watched the video below and practiced our shaking technique, we wanted to be able to smash our particles of butterfat against the sides of the jar to make our butter as quickly as possible.

 
Check out this clip which explains how cream turns into butter.

Click here to see our cow portraits.


Friday, 25 May 2012

Teddy Bear Cars

My lovely class have been working really hard lately - learning their letters and letter sounds, counting and number recognition, reading and writing, and of course learning our classroom routines and school manners (it's no wonder they are worn out by 3.00pm). As a special treat in recognition of this hard work we brought our teddies and soft toys along to school for a teddy bears' picnic and I made these super cute teddy bear cars.

  
To make the cars; stuff a Tiny Teddy cookie into a mini Moro or Milky Way bar, melt a little chocolate and use it to attach four chocolate Pebbles or M&Ms to the side of the car for the wheels. (I had to cut the legs off some of my teddies and use the chocolate to glue the head of the teddy to some mini dairy milk chocolate cars - they were running low on mini-chocolate bars at the dairy!) 


Tuesday, 22 May 2012

Train Like an All Black

For our Mountaineers Famous New Zealanders Discovery session we practiced training like the All Blacks. Because the All Blacks are famous New Zealanders! 

Skipping, jumping on the rebounder, stepping and jumping between the rungs on our rope ladder and over the mini hurdles, balancing on the beam, and of course we were busy practicing our rugby ball passes.


 (I loved watching the children helping each other balance and take turns on the beam.)


Friday, 18 May 2012

Cute Cow Portraits

As part of our 'Milk Science' inquiry learning theme (and my attempt at incorporating our inquiry study into other parts of my classroom program) we have been reading the first verse of Robert Louis Stevenson's 'The Cow' poem (click here for a pdf printable). And I was desperate to thought I would attempt this cow portrait art lesson with my gorgeous bunch of 5 year olds.

Here are some of our portraits:


 Moo!

Wednesday, 16 May 2012

On the Farm

Check out our latest Mountaineers Discovery session. This week we have been exploring lots of farm themed activities. Here are some of our craft activities from our 'On the Farm' discovery session:

 Hand-print sheep.

Finger puppet pigs. (Note the two adorable black dots for the pig's snout.)

Baby chick paper plate masks.

We also try to include early literacy writing and reading activities, counting and number activities, role-play, construction and spacial awareness activities, and sensory experiences (but not all in one session!)

Read this post about our visit by a dairy farmer.

Tuesday, 15 May 2012

Farmer Visit

Today as part of our inquiry learning a real-life dairy farmer came to visit. He and his wife were fantastic!

They had made a little video of their farm and what they do. The children were fascinated with the cows and how they are milked by the machines, where the milk goes, and the giant milk tanker. Another favourite was the shot of the tractor and truck feeding silage to the cows. 

Silage for us to smell.
They also brought some silage and parts of the milking machine for us to touch (and smell). I used the GoDairy website to hook us up with a farmer.

We are going to check out Rosie's world too, and meet Rosie the New Zealand dairy industry's Cowbassador.

Friday, 11 May 2012

Mother's Day

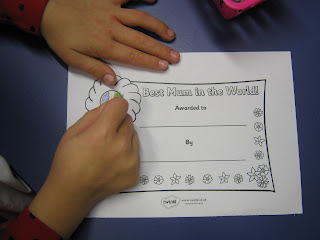
For our Mother's Day Discovery session we were very busy creating a lot of Mother's Day crafts and activities; certificates for Mum, Mother's Day cards,dressing up like Mum, cafe and cooking role-play, brown sugar body scrub, letter 'm' paper mosaics, glittery-love-heart pegs, and cup-cake liner paper flowers.


I love peg-craft, 
cutting+glue+pegs+glitter=perfect craft activity!


Some children went home with a fistful for gifts for Mum (hopefully some lasted until Sunday).

The following day we had some great writing about our Discovery activities.

I made a flower for Mum. She put it in her vase. 

I made a flower for my Mum. Mum will love it.
 
I made a card for Mum.


The children's writing was so sweet that I typed them up for the children to illustrate, and made a book for them to read together in our reading corner. I think it is really important to value and share children's writing and I try to show this by publishing our stories. I always photocopy the children's finished published work and send a copy home for Mum and Dad to read too.

Thursday, 10 May 2012

Autumn Leaf Art

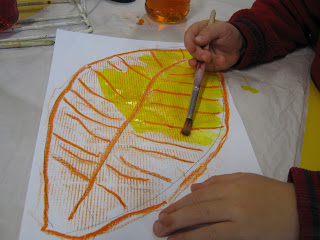
With all of the beautiful Autumn leaves around at the moment I was inspired to attempt some Autumn Leaf Art.

We went on a leaf hunt looking carefully at the warm colours of the leaves, and studying the shapes of the different leaves we found. We also spent time talking about warm and cool colours. Warm colours are 'fire' colours; red, orange, brown, and yellow. Cool colours are 'water' colours; blue, green, and purple.

 
Back in the classroom the children selected a leaf shape that I had cut from cardboard earlier. They used this leaf as a stencil to trace around with pencil.

 The children carefully drew veins on the leaf.

Then they went over their leaf outline with a warm colour of crayon. 

Using a piece of corrugated card under their paper they rubbed with the crayon over the leaf to create texture on their artwork.

Now - thinking about what they had learned about warm colours they chose a warm colour of dye and carefully painted over the leaf with the dye.

When the leaf was dry they chose a cool colour dye and painted their background.

 
I hung up our beautiful leaf art with these Autumn words from Sparklebox.

We have also been reading this sweet Autumn poem.